Storage Settings
The Storage Settings page allows you to manage where screenshots and related media files are stored in TimoDesk. By default, all screenshots are securely saved on the TimoDesk storage server, so you can start tracking immediately without any additional configuration.
For organizations that require greater control, compliance, or custom infrastructure, this page also provides the option to connect your own storage server-such as an FTP server or an S3-compatible storage service. Once a custom storage is activated, all newly captured screenshots will be uploaded directly to your selected storage instead of the default TimoDesk storage.
Storage Settings is designed for teams that want flexibility and ownership over their data, while still keeping the setup optional and safe for users who prefer the default managed storage.
Storage Setting Preview

Widgets Overview
The Widgets section at the top of the Storage Settings page provides a quick summary of your screenshot storage and usage status. These widgets help you understand how much data is being stored and where it is currently managed.
-
Storage Used
Displays the total amount of storage space consumed by screenshots and related files across your active storage server. -
Total Screenshots
Shows the cumulative number of screenshots captured since tracking started, regardless of billing cycle. -
Current Billing Cycle Screenshots
Indicates how many screenshots have been captured within the current billing period, helping you monitor ongoing usage. -
Active Storage Server
Confirms which storage service is currently in use. This will display TimoDesk if you are using the default storage, or your custom storage name if an FTP or S3 se

How to Add an S3 Storage
TimoDesk allows you to connect your own S3-compatible storage so screenshots can be stored on your preferred server instead of the default TimoDesk storage. Below is a clear, step-by-step explanation of how to add and configure an S3 storage, including the purpose of each required field.
-
Step 1:
Click the Add Storage button from the Storage Settings page. A popup titled “Add New Storage” will appear.

-
Step 2:
Fill in Storage Details:

-
Name
A friendly name to identify this storage in TimoDesk (e.g., S3 Bucket 01). This is only for your internal reference. -
Storage Type
Select S3 Storage from the dropdown. This tells TimoDesk to treat the configuration as an S3-compatible service (AWS S3, DigitalOcean Spaces, Wasabi, etc.).
-
Access Key
The public access key generated from your S3 provider. It identifies your account and allows TimoDesk to authenticate requests. -
Secret Key
The private key paired with the access key. This must be kept secure, as it grants permission to access your storage bucket. -
Region
The region where your bucket is hosted (for example: us-east-1, ap-southeast-1). This helps TimoDesk route requests to the correct data center. -
Bucket Name
The exact name of the S3 bucket where screenshots will be stored. The bucket must already exist in your S3 account. -
End Point
The service endpoint of your S3 provider. -
Public URL
The public base URL used to access files stored in the bucket. TimoDesk uses this to generate valid screenshot URLs.
-
Name
-
Step 3:
After completing all fields, click Submit. The storage will appear in the storage list with a Verify Now option.
-
Click Verify Now to test the connection.

- If all credentials and settings are correct, the storage will be successfully verified.
-
Click Verify Now to test the connection.
-
Step 4:
Once verified, click Enable.

Important Notes
- Only one storage can be active at a time.
- After enabling your own storage, TimoDesk is not responsible for upload failures caused by incorrect credentials, permissions, or server issues.
- Make sure your bucket has proper read/write permissions before enabling it.
How to Add an FTP Storage
Adding an FTP storage in TimoDesk follows the same overall process as S3 storage. The only difference is the credentials and connection details, which are specific to an FTP server. This option is recommended only if you are familiar with FTP server configuration and access management.
-
Step 1:
From the Storage Settings page, click Add Storage. It'll open a popup.
-
Step 2:
Provide FTP Configuration Details:

-
Name
A custom label to identify this FTP storage inside TimoDesk (for example: Office FTP Server). This is for internal reference only. -
Storage Type
Select FTP Storage from the dropdown. This enables FTP-based file uploads.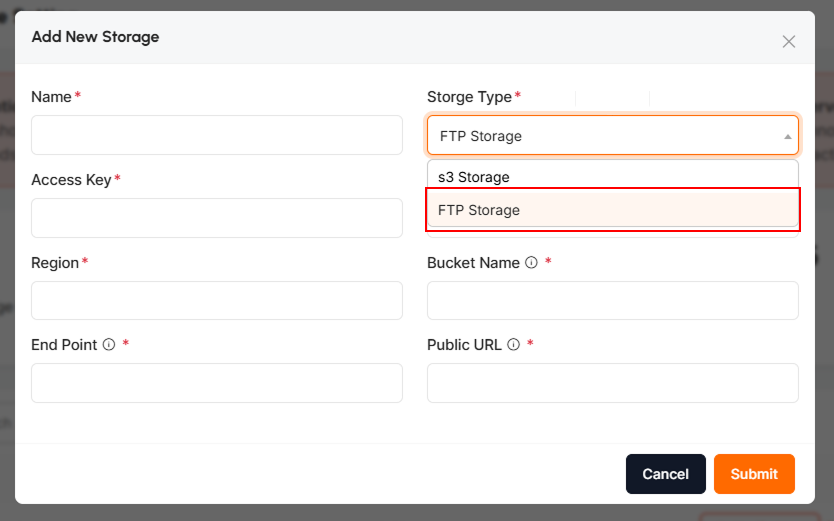
-
Host
The hostname or IP address of your FTP server. Example: ftp.yourdomain.com or 192.168.1.10. -
Port
The port number used by your FTP server. Common values: 21 (FTP), 22 (SFTP, if supported by your server). -
Username
The region where your bucket is hosted (for example: us-east-1, ap-southeast-1). This helps TimoDesk route requests to the correct data center. -
Bucket Name
The FTP account username with permission to upload files to the target directory. -
Password
The password for the FTP user. -
Upload Folder
The directory path on your FTP server where screenshots will be stored. Make sure this folder already exists and has proper write permissions. -
URL
The public URL mapped to the upload folder.
-
Name
-
Step 3:
Submit and Verify
-
The FTP storage will appear in the storage list with a Verify Now option.

- If all credentials and settings are correct, the storage will be successfully verified.
-
The FTP storage will appear in the storage list with a Verify Now option.
-
Step 4:
Once verified, click Enable.

Important Notes
- Only one storage can be active at a time.
- After enabling your own storage, TimoDesk is not responsible for upload failures caused by incorrect credentials, permissions, or server issues.
- Make sure your bucket has proper read/write permissions before enabling it.