
Clients
Clients are the people you do the work for. You invite them to their own client portal, where they follow the projects you pick and open only the screens you allow. This guide shows how to invite a client, choose what they see, manage their projects and turn their access off.
Who can use it: Organizers and Business Managers. Team Managers and Staff don't see the Clients page or the Clients tab on a project.
How to read the Clients page
The Clients page lists every client who has accepted their invitation. Click Clients in the sidebar to open it. Each row shows:
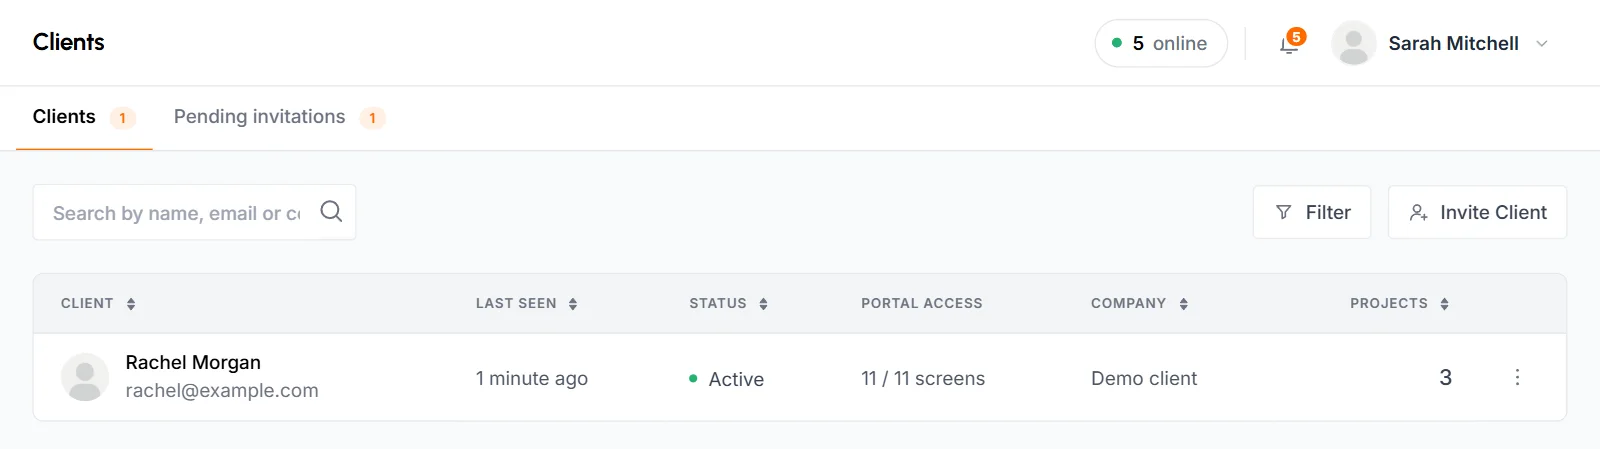
- Client
- Their photo, name and email. Click the name to open the client details page.
- Last Seen
- How long ago they last signed in to the portal, or Never signed in. Hover over it to see the exact date and time.
- Status
- Active or Disabled.
- Portal Access
- How many portal screens you've turned on for them, for example 8 / 11 screens. The Dashboard isn't counted, because every client has it.
- Company
- Their company, or Not set.
- Projects
- How many projects they can see. Click the number to open their Projects tab.
- Action menu (⋮)
- Portal access, Projects, Profile, and Disable access or Enable access.
Use Search by name, email or company to find a client. Click Filter to show only the clients of one Project, or only Active or Disabled clients. Click a column header to sort.
Invitations that nobody has accepted yet aren't on this list. They're on the Pending invitations tab next to Clients. The tab appears only while at least 1 invitation is waiting. See how to resend, copy or revoke an invitation.
How to invite a client
You invite a client by email and choose their projects and screens in the same popup. You need to confirm your own email address first. Until you do, the popup asks you to verify it. See email verification.
-
Click Invite Client
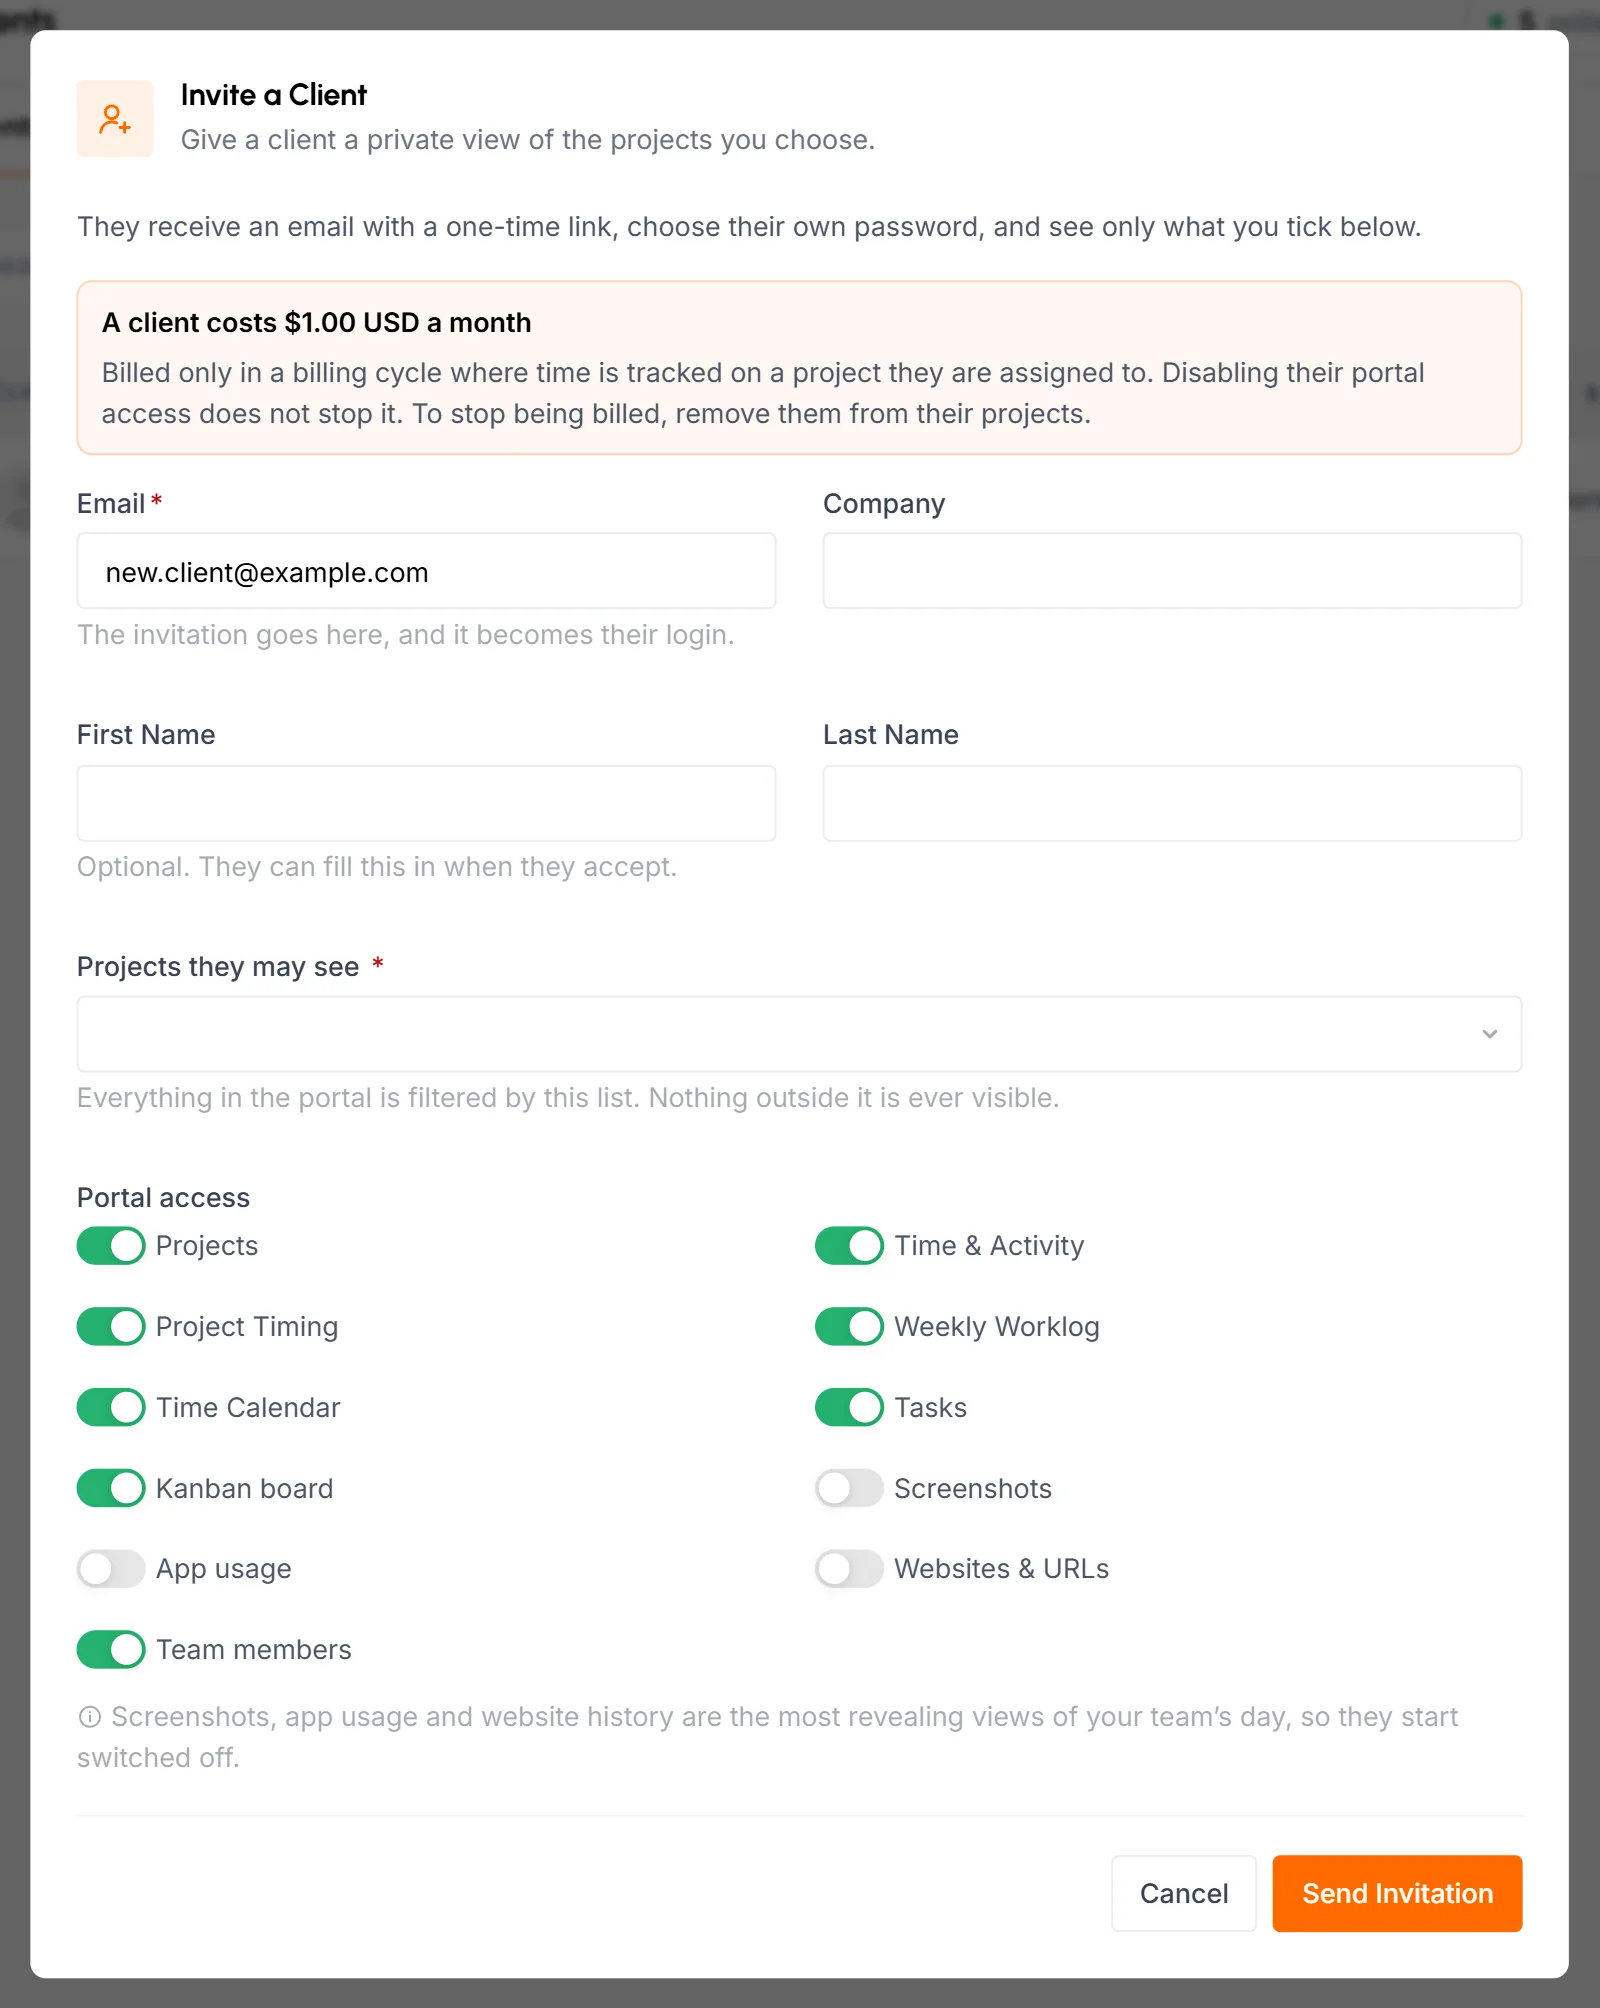
On the Clients page or the Pending invitations tab, click Invite Client. If you have no clients yet, click Invite Your First Client. The Invite a Client popup opens.
-
Fill in who they are
- Required. The invitation goes to this address, and it becomes their portal login. Each email can belong to only 1 client in all of TimoDesk, so an address that already belongs to a client of any organization shows "A client with this email address already exists".
- Company
- Optional, up to 80 characters.
- First Name and Last Name
- Optional, up to 40 characters each. If you leave them empty, the client fills them in when they accept.
-
Pick their projects
Under Projects they may see, pick at least 1 project. Everything in the portal is limited to these projects. You can add or remove projects later.
-
Choose their portal access
Under Portal access, turn each screen on or off. Hover over a switch to see what the screen shows. Screenshots, App usage and Websites & URLs start switched off, and everything else starts on. See what each screen lets a client see.
-
Click Send Invitation
TimoDesk creates the client, emails the invitation and opens the client's details page. The client shows on the Pending invitations tab until they accept.
If TimoDesk charges for clients, the popup shows the monthly price per client before you send. See do clients count toward your bill.
What does the client receive?
The client gets an email with the subject "[Organization name] invited you to their client portal". It names your organization and the projects you shared, and has an Open Your Portal button.
- The link works for 7 days and only once. The email shows the date it expires.
- The link opens a page where the client enters their first name, last name and a password of at least 8 characters.
- Accepting confirms their email address and signs them in to the portal. They then move from the Pending invitations tab to the Clients page.
Anyone who has the link can claim the account. Share it only with the client.
How to resend, copy or revoke an invitation
The Pending invitations tab lists every invitation that hasn't been accepted, including expired and revoked ones. Each row shows the email it went to, the number of Projects, when it was Sent, when it Expires and its status: Invited, Invite expired or Invite revoked. Use Search invitations to find one.
Resend an invitation
Choose Resend invitation in the row's action menu, or click Resend on the client's details page, then confirm with Resend Invitation. TimoDesk emails a new link that works for another 7 days. The link sent before stops working. This also works for expired and revoked invitations.
Copy the link
While an invitation is still valid, the client's details page shows when it was sent and when it expires, with a Copy link button. Use it if you want to send the link yourself.
Revoke an invitation
Choose Revoke invitation in the row's action menu, or click the revoke icon on the client's details page, then confirm with Revoke Invitation. The link stops working right away. The invitation stays on the tab as Invite revoked, and the email stays reserved for this client. To let them in later, resend the invitation.
You can't delete an invitation. If you sent it to the wrong address, change the Email on the client's Profile tab and resend it.
The client details page
The client details page holds everything about one client. Click a client's name on the Clients page or the Pending invitations tab to open it.
The header shows their photo, name, status, email, company, phone and the date they joined, or Has not joined yet. A green dot next to the email means they've confirmed it. The buttons on the right are:
- Assign Project, to give them more projects. It's hidden when they can already see every project.
- A revoke icon, while their invitation can still be revoked.
- A Disable Access or Enable Access icon. See how to disable or enable a client.
Below the header, 4 cards show the Time tracked on their projects, the number of Members contributing, the Last work tracked and the Screens they can open. The cards count all time on the client's current projects.
The page has 3 tabs. It opens on Portal Access.
| Tab | What you do there |
|---|---|
| Portal Access | Turn portal screens on or off. See how to choose what a client can see. |
| Projects | View and remove the projects they can see. See how to add or remove a client's projects. |
| Profile | Edit their details and photo. See how to edit a client's profile. |
How to choose what a client can see
You choose a client's screens on the Portal Access tab of their details page. Turn each switch under Portal screens on or off, then click Save Access. The change applies the next time the client opens a page in the portal.
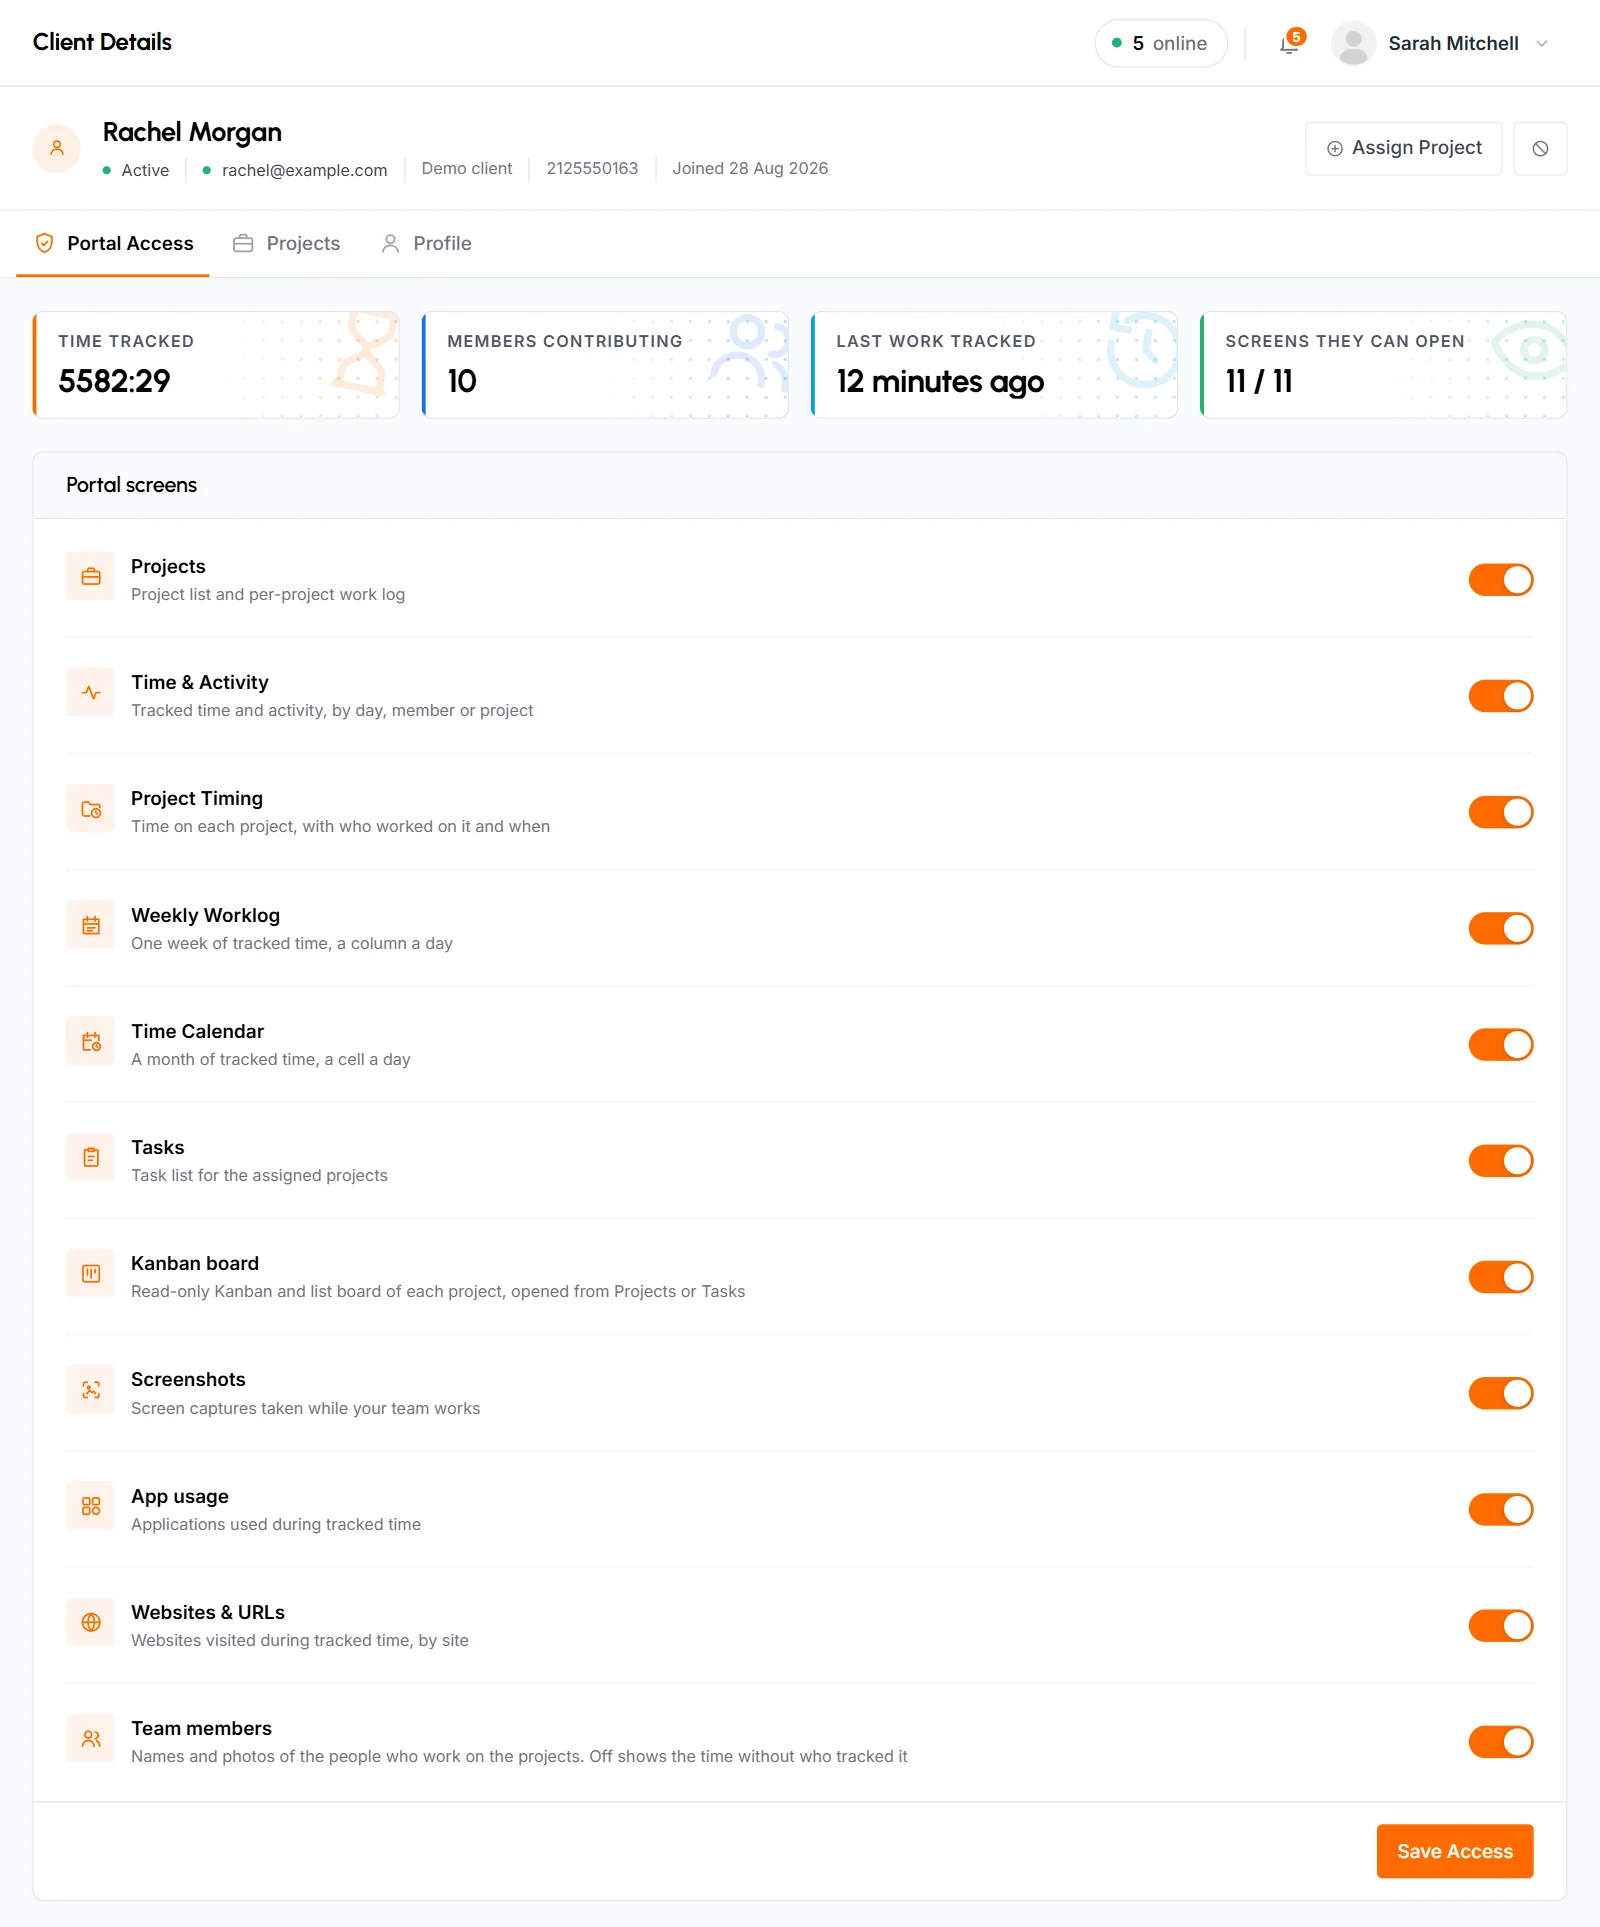
Every screen shows data only from the client's own projects. The client can look, but can't change anything.
| Switch | On for new clients | What the client can see |
|---|---|---|
| Projects | Yes | The list of their projects and each project's work log. |
| Time & Activity | Yes | Tracked time and activity, by day, member or project. |
| Project Timing | Yes | Time on each project, with who worked on it and when. |
| Weekly Worklog | Yes | 1 week of tracked time, with a column for each day. |
| Time Calendar | Yes | A month of tracked time, with a cell for each day. |
| Tasks | Yes | The task list of their projects. |
| Kanban board | Yes | A read-only board and list view of each project. The client opens it from Projects or Tasks, so keep at least 1 of those on too. |
| Screenshots | No | The screenshots taken while your team worked on their projects. |
| App usage | No | The apps your team used during time tracked on their projects. |
| Websites & URLs | No | The websites your team visited during time tracked on their projects. |
| Team members | Yes | The names and photos of the people who work on their projects. This isn't a screen. When it's off, the other screens show the time but not who tracked it. |
Every client also has a Dashboard with a summary of hours, projects and the team. It isn't on the list because you can't turn it off.
Screenshots, app usage and website history show the most about your team's day, so think about your members before you turn them on.
Before October 6, 2026, 1 switch covered Time & Activity, Project Timing, Weekly Worklog and Time Calendar. Clients who had it now have all 4 turned on. Team members also became its own switch then, and it was turned on for every existing client. Check these switches if you set up clients before that date.
How to add or remove a client's projects
A client sees only the projects you assign to them. You can change this from the client or from the project.
From the client
- On the client's details page, click Assign Project. The Assign Projects popup lists every project they can't see yet.
- Pick 1 or more projects and click Assign.
The client gets a notification in the portal for each new project, such as "You now have access to [project]".
The Projects tab lists the client's projects with their Members, Tasks (completed out of total), Time Tracked and buttons to open the project's Board or Details. To take a project away, click Remove Access on its row and confirm. The client stops seeing its time, tasks and screenshots right away and gets a notification that their access ended.
From the project
Organizers and Business Managers see a Clients tab on each project's details page. It lists the clients who can see the project, with their Company, Portal Access, Status and a Remove Access button. The shield button opens the client's details page.
- On the project's details page, click the Manage Clients button in the header. The Project Clients list opens.
- Click Assign Clients, pick the clients and click Assign. The list includes clients who haven't accepted their invitation yet.
You can remove a client from the same list or from the Clients tab. To invite someone new, use the Clients page.
A client with no projects can still sign in, but the portal has nothing to show them. Removing a project from a client doesn't change the project, its members or its tracked time.
How to edit a client's profile
Open the Profile tab on the client's details page. Change First Name, Last Name, Company, Phone, Email or Address, then click Save Changes.
To change their photo, click the camera on the picture and pick a PNG, JPG, JPEG or WEBP file. Remove photo deletes it for good, here and in the portal. The client can also change their own name and photo in the portal.
The left side of the tab shows whether their email is verified, when they accepted the invitation, the date they became a client and their sign-in method.
The email is the client's portal login. If you change it, the client must verify the new address before the portal lets them back in.
How to disable or enable a client
Disabling a client turns off their portal access. You can't delete a client. TimoDesk keeps the account, its projects and its portal access settings, so you can turn it back on later.
- Choose Disable access in the client's action menu, or click the Disable Access icon on their details page.
- Optionally type a Reason, then click Disable Access.
The client is blocked right away. When they open the portal, they see that your organization turned off their access, with your reason if you gave one. Their status changes to Disabled.
To turn access back on, choose Enable access or click the Enable Access icon, then confirm. The client can sign in again with the same projects and screens.
To stop someone who hasn't accepted yet, revoke the invitation instead of disabling them.
What does a client see in the portal?
The client portal is a separate site where your clients sign in with their email and password. It shows the Dashboard plus the screens you turned on, and only for their projects. They also get notifications when you add or remove a project, and they can manage their own name, photo and password. See Client portal for a full tour.
Do clients count toward your bill?
They can. When TimoDesk charges for clients, the price per client per month shows in the Invite a Client popup. A client is billed only in a billing cycle where someone tracked time with the desktop app on a project the client is assigned to. Manual time alone doesn't count.
- Billable clients get their own line on the invoice, after the members line.
- The Billing card on the Dashboard shows the billable clients for the current cycle.
- The bill depends on project assignment, not on sign-ins. Disabling a client doesn't stop it. To stop paying for a client, remove them from their projects.
See how clients are billed for more on who counts in a cycle.
Limits and edge cases
- An email address can belong to only 1 client across all of TimoDesk. A revoked invitation still holds its address.
- Invitation links last 7 days and work once. Resending makes the old link stop working.
- Clients can't be deleted. Disable them instead.
- Clients see only their assigned projects, and only the screens you turned on. They can't edit tasks, time or anything else.
- Changes to projects and screens apply the next time the client opens a page in the portal.
- Only Organizers and Business Managers can manage clients. A Team Manager or Staff member who opens a client link gets an error.
Common questions
Can I delete a client?
No. Disable the client instead. They lose portal access right away, and you can enable them again later with the same projects and screens.
How long does a client invitation work?
7 days, and only once. After that it shows as Invite expired on the Pending invitations tab, and you can resend it to get a new link.
Can clients see screenshots?
Only if you turn on the Screenshots switch on their Portal Access tab. It starts off for every new client, and so do App usage and Websites & URLs.
Can I hide who did the work?
Yes. Turn off Team members on the client's Portal Access tab. The portal then shows the time on their projects without names or photos.
Can a client change anything in TimoDesk?
No. Clients can only look at their projects. The task board is read-only, and they can't edit time, tasks or members.
Why does TimoDesk say a client with this email already exists?
Each email can belong to only 1 client in all of TimoDesk, including revoked invitations and clients of other organizations. Use another address for this client.
Does disabling a client stop the charge for them?
No. Clients are billed by project assignment. Remove the client from their projects to stop the charge.
Who can manage clients?
Organizers and Business Managers. Team Managers and Staff don't see the Clients page or the Clients tab on projects.